1. LEARNING TO WALK BEFORE YOU RUN
I titled this first article after the ye old proverb. Which means “You must master a basic skill before you are able to learn more complex things”. Photography like a lot of things in life has a pretty steep learning curve. Just look at the new generation of digital camera’s now with their complex menu’s and all the controls they offer. This can be confusing for an experienced photographer let alone a novice. So let’s take a minute to look at the digital era we're currently in. Although it is exciting with what digital cameras are capable of and the image quality they can produce. I believe in many ways they have made photography much more difficult to learn. Back in the film days a high quality SLR camera had controls for your aperture, shutter speed, ISO and metering. They had drive modes, auto focus, exposure compensation, flash, mirror lock up and a few others I won’t mention. Camera’s now have all these plus more, including complex menu selections. The good news is that almost half of your camera settings in your menu can be set once and you most likely won’t ever have to change them again. But learning and understanding what the changes do is important.
During my mentoring sessions with students one thing that I find common is they want skip mastering the basics, which is understanding your camera controls and how to use them. They want to go from being a novice to becoming Ansel Adams in a few short lessons. How can you learn to create great images if you don’t understand your tools and how to use them. This only creates barriers that will get in your way and prevent your creative side from coming out. I’ll give you one example of why mastering the basics is so important. See the image below I call “Into the Light”. I lived in the NW for years and upon many trips to the Redwoods always wanted to capture God rays streaming in through the fog. I had seen this done so well by other photographers, but never lucky enough to capture myself. On this particular trip I had a spent couple hours hiking the Damnation Creek trail head. It was foggy the entire morning with no sign of clearing so I decided to call it a day and headed back to my car. I packed everything up and started to leave, I got about a mile up the road and noticed the sun starting to peek through the fog. So I immediately turned the car around and went back to the trail head. I put my camera on my tripod, threw on my backpack and headed up the trail again. Confident this time I might finally get t hose god rays I had been in search of. Then after about another hour of hiking toward where I seen the sun starting to come out, I found nothing but fog. Frustrated at this point I decided put my camera back into my backpack, call it a day and headed back. Then as I started back down the trail I hiked maybe a quarter mile and as I came around this corner there was the scene you see below. So as fast as possible I set up my tripod, took off my pack, set up my camera and choose my settings. Then I composed my shot and got off three frames before the god rays were gone. I had done all this in just a little more than a minute, which was about how long the scene lasted. The only reason I could do it in an instant, is because I knew my camera and controls like their an extension of my own hand. One thing you will learn in landscape photography is that many times mother nature will only give you a sparse moment in time. So if you can't act quickly enough you will most likely miss the opportunity.
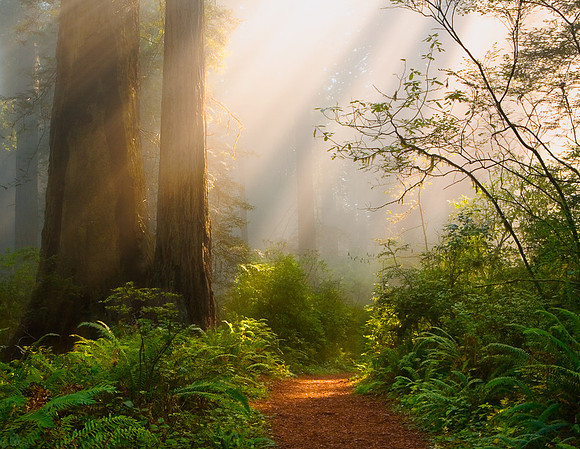

So let’s talk about learning to walk now and what is the best way to do that. First you must learn how to get out of Auto mode on your camera and learn to shoot in manual. This is most likely one of the scariest things for new photographers. The new breed of cameras now have a whole bunch of auto & scene modes built in to help you capture your image. So why not just let the camera do it for you? Because even though these modes work well, you lose control over your image creation. The camera is making most of the decisions for you, when you should be making them. It is those decisions and controls that you need to learn, if you want to take your photography to the next level.
So start by learning what the different controls are for and how to use them. Please do not skip this step because it is the most important one of all. You will not find one great photographer out there that has not done this. So you might be thinking what is best way to do that and there is no right or wrong answer to that question. Everyones learning ability and what works best for them is different for each person. Some prefer reading, some learn better from visual instruction like video’s. Others prefer hands on like personal instruction. So here are some of my suggestions. I would suggest starting some with free online instruction. There is Digital Photography School, Exposure guide, Petapixel.com, Learn basic Photography and Improve Photography. These are just a few available out there, try doing a google search and see what you can find.
If you prefer visual instruction consider some video tutorials. Lynda.com has lots of courses for beginners for a modest monthly cost. Skillshare has free online instruction, but there is a monthly fee for unlimited use. The one I would recommend is Kelby One. They have a huge amount of online video’s for beginners to experts. That cover just about anything you would ever want to learn about photography. They are little more expensive than most of other sites, but worth it if you want to learn from some of the best photographers in the world. Next is YouTube which has a lot of free online instruction as well. Last there is more books out there on the subject than I could ever list. So if you enjoy reading try Amazon.com. I would suggest trying one of the Canon, Nikon or Sony for Dummies series by Julie Adair King. There is a whole series written for each specific camera model which can be helpful.
Free online info, books and video’s are a great starting point, but then I would suggest maybe taking a photography course. Most local colleges offer them and the cost is usually modest. It’s worth mentioning that if you do take a college course, be careful which one you sign up for. A lot of them do teach camera basics, but they don’t always teach you how to apply those into your every day to day photography. I have had several students I mentored that said they learned more in those 3 hours then they learned in an entire course at their local college. Which brings me to one of the best way’s to learn. That is through private mentoring sessions with a professional or experienced photographer. One of the big advantages is that they usually just involve you or maybe a couple of students and the teacher. You get a lot more one on one attention and they can tailor their instruction to the area’s you need the most help in. It can help increase your learning curve over reading books and/or watching videos a lot.
Another option is a workshop by a Professional photographer. But I would caution you on taking one of these, especially if you just a beginner wanting to learn how to use your camera. Not that workshops are bad, by the contrary you can learn a lot in a workshop. From my experience though, the ones I have taken were not geared towards beginners. A lot of professionals will tell you they are, but most workshops have anywhere from 6-15 students in them. So they just don’t have enough time to spend with each student or can they tailor their instruction to what will benefit you the most. So if you do take a workshop, be selective and try to get recommendations from someone who has taken it before. That way you can find out if it is the kind of instruction that will give you the most bang for your buck.
Last but not least is look into joining a local Photography club. Most clubs have a fair amount of experienced photographers that are willing to help new students. If you happen to live in Utah and the Salt Lake City area I would recommend the Wasatch Camera club, where I am a member myself. There is also world wide organizations like Photographic Society of America (PSA). Another one to consider is Meetups which are getting popular. They are usually free and they give you the opportunity to meet other photographers in your area that share the same passion as you. Check your local area and see what is available.
Now last and in my opinion the most important part of learning is “PRACTICE”. I can’t stress enough how important practice is. Especially if you just took a photography course or spent time with a professional. You need to go out and practice everything you just learned. It’s so easy these days to caught up in day to day things that get in the way like work, family, kids, etc. Try and commit to at least one day each week for 2-3 hours. Everyone if they budget their time can find an extra 2-3 hours per week.
So remember start my setting small goals for yourself. Then as you achieve those goals you will find that each one stacks upon each other. Then as you start to see improvements in your work, your confidence will grow as well. Even as you start to learn and get comfortable with all your controls and how to use them, still continue to practice. Like the expression goes “Practice is the mother of all skills” and skills give birth to Mastery.
2. HOW YOUR CAMERA METER SEE'S
One of the things I find most beginning photographers don't understand is how to get proper exposures. This is the one thing when I mentor a new student, wants to learn first and should. It is one of the most important parts of creating images. But to understand exposure you need to know how a camera meter works first. Before we get into that discussion, let’s talk about the two different types of light meters. That way, you should have little better understanding of the type of meter your camera uses.
There are two different types of light meters, incident and reflected light meters. All cameras only use reflective meters. To use an incident meter you will need to purchase a light meter like those from Sekonic. The advantage to having an incident meter is that they provide both incident and reflective metering. Incident meters measure the light falling on the subject. Reflected light meter's measure the light reflecting off your subject, see (example one). So let’s talk about the difference between the two and the advantages and disadvantages of both.
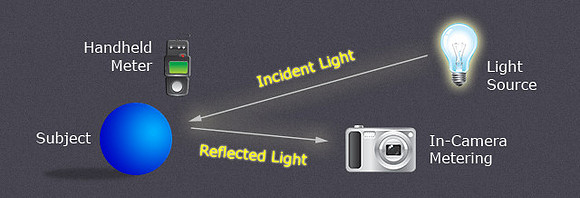
EXAMPLE ONE
All in-camera light meters have one fundamental flaw. They only measure the light reflecting off your subject. This means they can merely guess how much light is hitting the subject. So why is that a flaw you ask? That is because the tonal value or luminance of your subject influences how much light is reflected back. To explain why that causes problems you need to understand how your camera meter uses that information.
The photography industry has adopted a standard which it considers a proper exposure to be. That standard is 18% grey or medium grey as some call it, see (example two). As you can see in example two, all four different colors have one thing in common. They have the same luminance or tonal value as each other. Your camera meter doesn’t care about color, only how dark or bright that color is. It doesn’t know if you're shooting a bride in a white dress or snow-covered mountains. So when your camera meter is reading a scene in front of it, it wants to make it 18% grey. There lies the problem, how often when you're taking pictures is everything in the scene 18% grey in tonality.
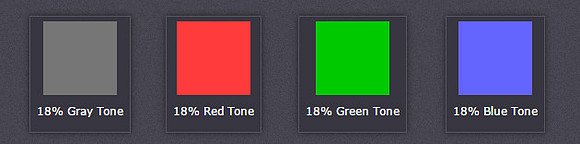 EXAMPLE TWO
Another way to illustrate the effect reflected light has on your camera meter see (example three). Those two shots were both taken on evaluative metering mode. I used aperture priority so the camera would pick what it thought was the correct exposure for each shot. Notice how the camera meter reduces the exposure when the white paper was introduced in the background. That is because the color black absorbs most of the light hitting it and reflects very little. The color white, does the complete opposite. Notice how the image with the white background looks medium grey, doesn't look white at all. That is because the color white reflects most of the light, and the meter wants to make it 18% grey.
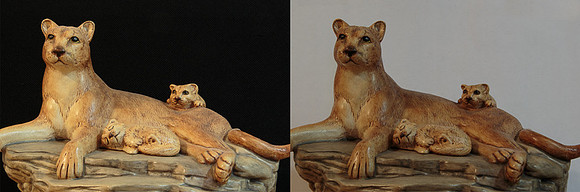 EXAMPLE THREE
Another flaw worth mentioning is that not all camera meters adhere to the industry standard of 18% gray, but closer 12-18%. It's also worth mentioning that some camera meters now do use color information to help calculate exposure. Like Nikon's 3D Matrix Meter and Canon's RGB+IR metering sensor. However, that is another whole discussion on its own. It does explain why some cameras do better than others on getting the exposure correct.
Now that you understand the flaws of your camera meter, let's talk about the advantages. The main advantage is that they take the reading from where you are and not the subject themselves. Another advantage is by using different metering modes like your spot meter, you can take a reading on just one small part of a scene. That brings us to our next discussion, which is incident light meter.
Incident meters only measure the light falling on the subject (example one). Because it isn’t affected by the luminance or tonal value of the subject in your scene, it isn’t fooled by dark or bright objects. It is only measuring the intensity of light source hitting it. They are very accurate and record colors and tones as they should be. This can be an advantage when trying to calculate the proper exposure for a given subject or scene. The one thing about incident meters is for them to be accurate; you must take the reading from where your subject is. This brings us to the disadvantage incident meters represent. Taking the light reading from the position of your main subject, isn’t always possible. You will find that especially true in landscape, sports or wildlife photography. That is why most incident meters work better for studio work, indoors or portrait photography. They can also work well outdoors, as long you can take the reading from where the subject is located.
So now how do you make sure you get the correct exposure every time? The rule of thumb a lot of professionals will tell you is to expose for the highlights in your scene and let the shadows fall where they may. That rule works reasonably well, but isn’t always the case and here is why. Just about every scene you shoot is going to be unique. Therefore, the elements in each scene that are your main subject or hold the most weight are thereby, different as well. So exposing for the important elements in your scene should be your priority. Here is an example of what I mean, see (example four). Since the gas station is my main subject, I needed to overexpose the sky so the gas station wasn’t underexposed like in (example five). Same thing if you're taking a portrait and the sun is to their back. If you exposed for the background or highlights, then the person is going to look more like a silhouette. So sometimes you need to make compromises when you're choosing your exposure. There are ways to overcome some of those exposure problems like the ones we just talked about. So let’s take a look at how to do that next.
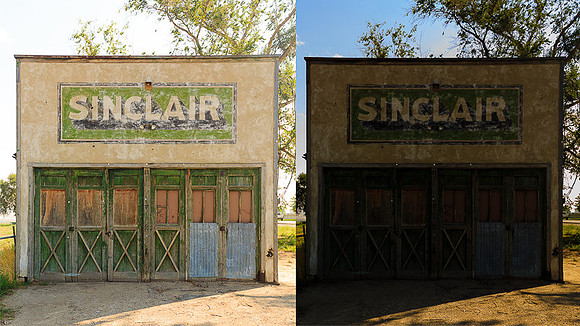 EXAMPLE FOUR EXAMPLE FIVE
Here are three ways to overcome exposure problems. Fill flash, HDR and neutral density graduated filters. There are other methods using Photoshop and multiple images that we will discuss in my next article. Fill flash is useful for portraits, or any subject that is within flash distance. HDR photography is popular now with digital cameras and most cameras have the option built in, so the camera can do it for you. You can also bracket a series of 3-7 images yourself, and then blend them later in Photoshop or with programs like Photomatix. Last is neutral density filters like those from Singh Ray. This is my favorite method for landscape photography. To explain each one of these in detail would need another whole article on its own. So please see my next article on "Dynamic Range and your camera."
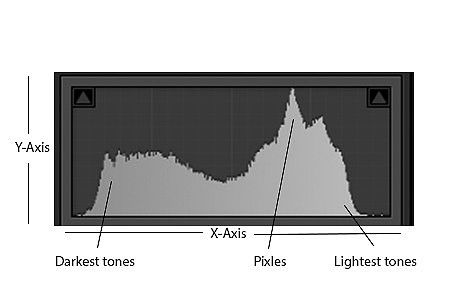
Now let's look at one of the best tools you have to ensure you get the correct exposure, and that is your camera's histogram. This is one of the finest tools a digital camera has to offer, but sometimes difficult for photographers to understand. The shadows on your histogram are on the left side with the darkest being zero; see (example six). The lightest tones are on the right side and the whitest tone that is achievable is 255; (example six). The X-axis represents all the shades between zero and 255. The Y-axis simple shows the number of pixels in each area of brightness. If your histogram touches either the extreme left-hand or right-hand side, it is "clipped." In that situation, there will be a loss of all detail in either the shadows or highlights.
 EXAMPLE SIX
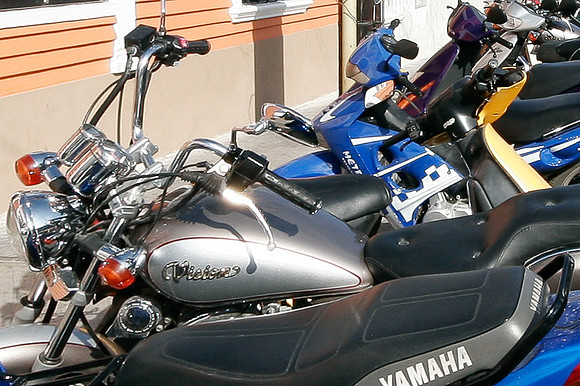
So the ideal exposure and to get the best tonal range in your image, the histogram should be in between the two like in example six. Due to the dynamic range of some images, it can be impossible sometimes to do that. So in those instances I would always expose for the main subject and let the highlights or shadows fall where they may. As I mentioned earlier, sometimes compromises are necessary when shooting that you can't avoid. There are times when it is impossible to expose the brightest highlights without clipping them and here is an example of what I'm talking about; see (example seven). The specular highlights on the handlebars are so bright that it is impossible to expose this scene properly without clipping on the histogram. So when confronted with those situations, it's ok to overexpose those areas. Our human eye cannot see the detail in those areas any ways, so they look natural to us.
 EXAMPLE SEVEN
Last let's discuss the one feature that your camera has to help you get proper exposures, which is exposure compensation. Exposure compensation is the control by which you can force your camera to make the exposure brighter or darker. It's available in most auto modes, aperture priority, shutter priority, and you can also do it yourself in manual mode. You can select how much you want the camera to adjust your exposure + 5 stops in 1/3 or 1/2 stop increments. In manual mode, you can adjust the exposure for as many stops as needed.
Now you should start to understand why it is important to learn all your camera's features and controls. One thing I would like for you to take away from this article is that getting good exposures is easier than it may appear. It may seem difficult on the surface at first, but once you understand how to read a histogram that is 90% of it. Then learn how to use your camera so you take control over each exposure is the other 10%, and that is the secret formula. Well then you might ask why I need to know all this other stuff you talked about. Like what my camera meter is doing and 18% grey, etc. That is because by understanding what your camera is doing, makes it much easier to know when to use things like exposure compensation. Which scenes your camera might or might not have problems correctly exposing. Or those compromises that you will sometimes need to make so you can get the best results for your image. Well good luck and remember practice, practice and more practice.